How to Build a Professional Bio Link Page (No Coding Required)
Building a professional bio link page takes under 10 minutes with the right bio link page builder. You do not need to write a single line of code. This guide walks you through every step — from choosing your username to publishing a fully customized profile that converts social followers into clicks on your most important links.
What You Will Have by the End of This Guide
By the time you complete these steps, you will have a live bio link page at your own Viopage URL, styled to match your brand, populated with your best links and social profiles, and tracked with analytics so you can measure performance from day one. You can share this URL in every social bio immediately after setup.
- A professional profile URL at viopage.com/yourname
- Your photo, display name, and bio displayed clearly
- 5 to 10 prioritized links with custom titles
- Social platform icons for your active channels
- A branded visual design from Viopage's 12 premium themes
- Analytics tracking every page view and link click from day one
- A QR code ready to share offline
Before You Start: What to Prepare
Gather these items before opening Viopage so the setup flows without interruption. The entire process moves faster when you have everything ready in advance.
- Your profile photo — a clear, square-cropped image at least 400x400 pixels
- A list of 5 to 10 links you want to feature, in order of priority
- The display name and 1 to 2 sentence bio you want on the page
- Your social media handles for the platforms where you are most active
- Your brand colors (hex codes) if you want to precisely match your visual identity
Step-by-Step: Building Your Bio Link Page with Viopage
Step 1 — Sign Up and Claim Your Username
Go to viopage.com/register. Enter your email address and create a password to start your 7-day free trial. During the signup flow, you will be prompted to choose your username — this becomes the last part of your profile URL (viopage.com/yourname), so choose carefully.
Username best practices: use your handle that is consistent across all platforms if possible. Consistency helps your audience find you and reinforces brand recognition. Keep it short — ideally your name or brand name without underscores or numbers if you can claim it. Once you choose a username, it becomes your permanent URL, so take 30 seconds to decide thoughtfully.
Step 2 — Upload Your Profile Photo
From the Content tab in your dashboard, click the profile photo area. Upload an image from your device or drag and drop it into the upload zone. Viopage accepts JPEG and PNG files. The editor lets you reposition the crop so the focus point is centered correctly before saving.
Photo tip: use the same photo you use on your main social platform. Visual consistency across your bio link page and your social profiles builds recognition and trust. Visitors who tap through from Instagram or TikTok should land on a page that feels immediately connected to the profile they just came from.
Step 3 — Add Your Display Name and Bio
Below the profile photo, fill in your display name and bio text. Your display name should match how you appear on your main social platforms — again, consistency is the goal. Your bio has space for 2 to 3 sentences. Use them to state who you are, what you create or offer, and why someone should explore your links.
Bio writing tip: lead with your niche or role, not your personality. "Fitness coach helping women build strength at home" converts better than "Just a girl who loves working out." The first version immediately tells a new visitor whether the rest of the page is relevant to them. The second is charming but does not drive action.
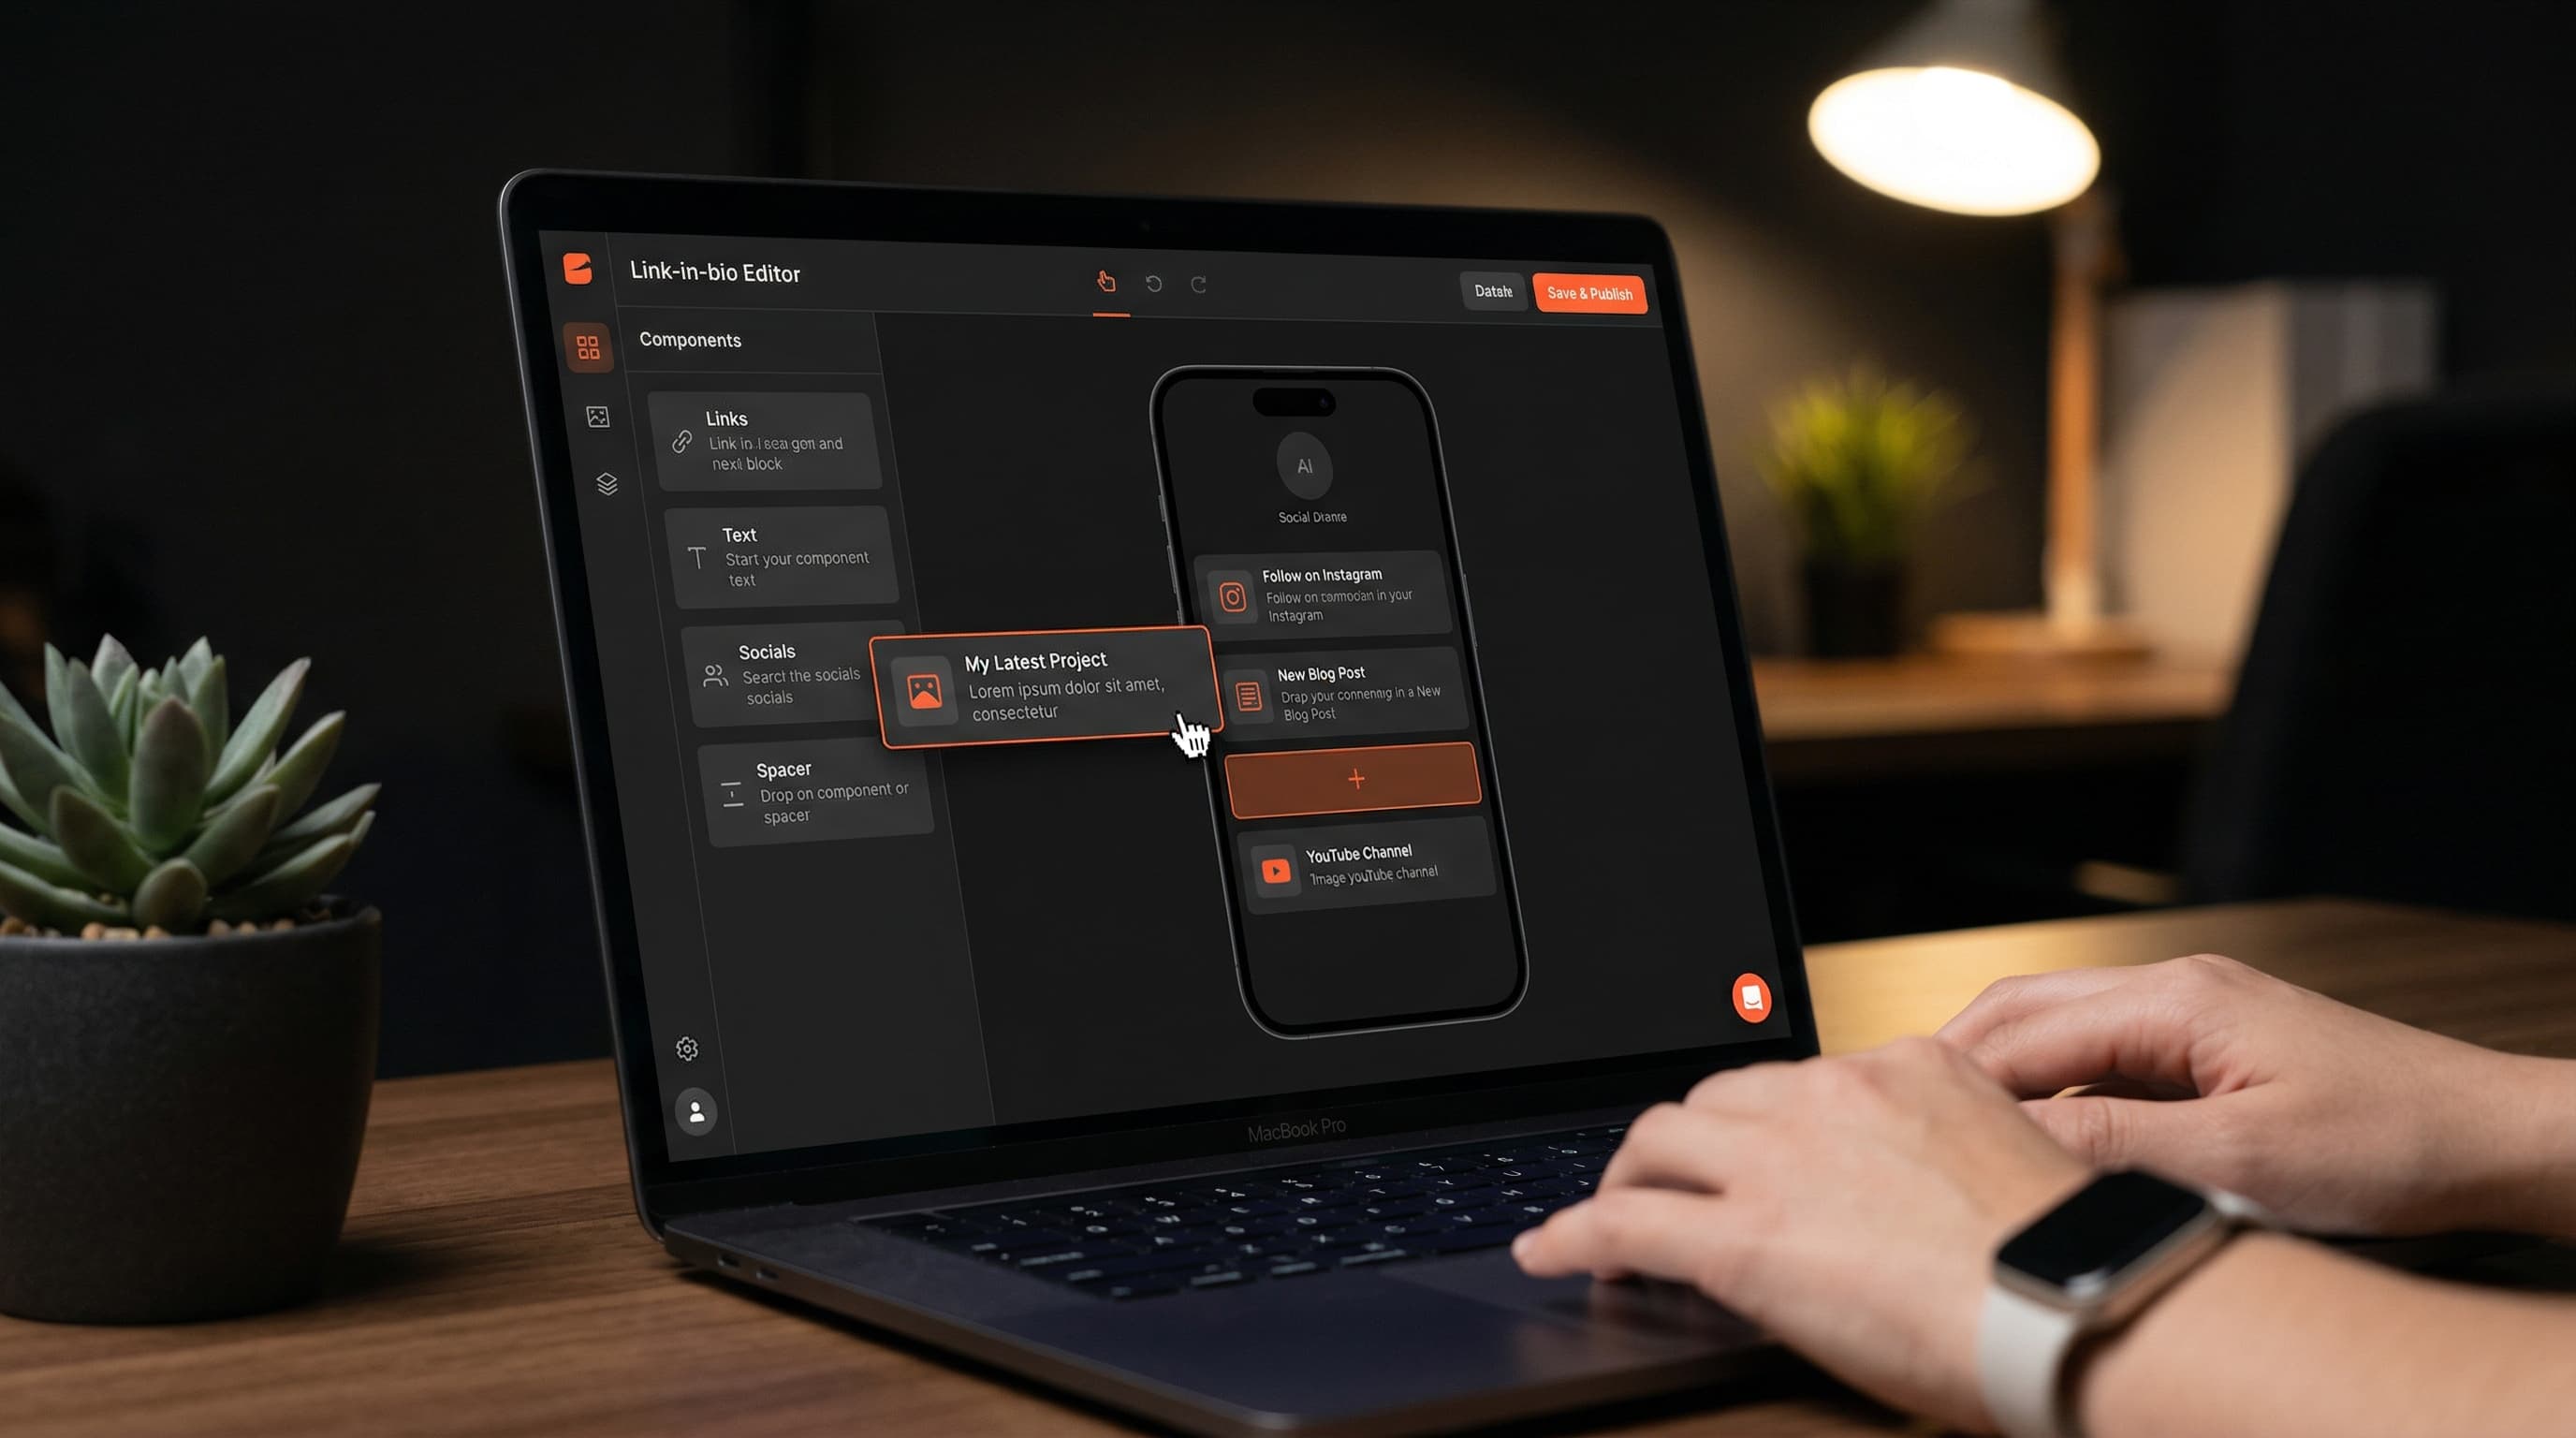
Step 4 — Add and Organize Your Links
Click the Add Link button in the Content tab. Each link requires two fields: the title (what the button says) and the URL (where it goes). Add all your links first, then organize them by priority using the drag-and-drop handles.
- Add your most time-sensitive or highest-value link first — this will sit at the top of the page
- Add your permanent links next: newsletter signup, product page, main YouTube channel, podcast
- Add secondary links: collaborations, affiliate resources, press kit, contact form
- Drag the links into their final order — most important at top, secondary links below
- Review each link title and make it specific — "Watch my latest video" beats "YouTube"
- Click each link to verify the URL opens correctly before saving
Link count guidance: keep the total between 5 and 10 links. Pages with fewer than 5 links look sparse and underutilized. Pages with more than 10 links create decision paralysis — visitors who see too many options often click none of them. The sweet spot is 6 to 8 focused, well-titled links.
Step 5 — Add Social Platform Icons
Below the link list in the Content tab, you will find the social icons section. Add your profiles on Instagram, TikTok, YouTube, Twitter/X, LinkedIn, Spotify, and any other platforms where you are active. These appear as icon buttons below your main links — they are a secondary discovery layer for visitors who want to find you across platforms.
Viopage supports 17+ social platforms including WhatsApp, Twitch, Pinterest, Snapchat, and others. Add only the platforms where you post regularly — icon buttons for abandoned accounts send a poor signal. Focus on your 3 to 5 most active platforms.
Step 6 — Choose and Customize Your Theme
Open the Design tab. You will see 12 premium theme presets laid out as visual cards. Click any theme to apply it instantly and see the result in the live preview panel on the right side of the screen. The preview updates in real time as you make changes, so you can experiment freely without publishing anything.
- Browse the 12 presets and click the one closest to your brand aesthetic
- Open the Background section to override the theme's default color — paste your exact hex code or use the color picker
- Try the gradient wallpaper options under the Wallpaper section — 9 premade gradient presets plus custom color stops
- Open the Buttons section to set button style (solid, outline, or ghost), corner radius (square, rounded, or pill), and shadow weight
- Open the Text section to choose your font from 10 curated options — pick one that matches your brand voice
- Open the Header section to adjust avatar style and the spacing between your profile elements
- Review the full live preview on mobile dimensions — most of your visitors will see this on a phone
Design principle: choose one primary color, one background treatment, and one font family, then stay consistent. Creators who try to use multiple accent colors or mix font styles end up with profiles that look busy rather than branded. Simple and consistent always performs better than complex and varied.
Step 7 — Preview Your Live Profile
Before sharing your URL, visit your live profile directly in a browser — not the dashboard preview. Open a new tab and go to viopage.com/yourname. Test every link to confirm it routes to the correct destination. Check the page on both your desktop and your phone, since the majority of your audience will view it on mobile.
This live check catches issues that the preview panel may not surface: links that open to error pages, profile photos that crop unexpectedly on certain screen sizes, or button text that gets truncated on narrow mobile screens. Ten minutes of testing before you publish saves you from sending thousands of followers to a broken page.
Step 8 — Update Your Social Media Bios
Your bio link page is only as valuable as the traffic you send to it. Update the link in your bio on every platform where you are active. On Instagram, go to Edit Profile and replace the current bio link with your Viopage URL. On TikTok, go to Edit Profile and update the Website field. Repeat for YouTube About, Twitter/X Profile, LinkedIn Introduction, and any other platform you use.
Once your Viopage URL is in your social bios, you will never need to change it again. Every time you want to promote something new, just update the relevant link on your Viopage dashboard. Your social bios stay permanently pointing to the same URL while the destination always shows your most current content.
Step 9 — Download Your QR Code
From your Viopage dashboard, locate the QR code section. Download the QR code as a high-resolution image file. This QR code links directly to your bio link page and can be placed anywhere your audience encounters you offline: business cards, product packaging, event slides, printed media, merchandise tags, or trade show materials.
The QR code updates automatically if you ever connect a custom domain — you do not need to generate a new code if your profile URL changes. It always points to your Viopage profile regardless of the domain setting.
Step 10 — Check Your Analytics After 24 Hours
Open the Analytics tab in your dashboard after your first 24 hours live. You will start to see data accumulating: total page views, individual link click counts, the countries your visitors are coming from, and the breakdown between mobile and desktop traffic. This data is your feedback loop for optimizing the page going forward.
Make a note of your baseline numbers: total views, total clicks, and which links are getting clicked most. Check back weekly. If a link consistently receives no clicks, either the title is not compelling or the position on the page is too low. If a link is getting significantly more clicks than others, consider whether it deserves more promotion in your social captions.
Ready to build your professional link-in-bio? Start your 7-day free trial with Viopage — no coding required, all features included from day one.
Start free trialAdvanced Tips for a High-Performing Bio Link Page
Once your basic page is live and you have a week of analytics data, consider these advanced optimizations. These are the tactics that separate good bio link pages from great ones.
Rotate Your Top Link Based on What You Are Promoting
The first link on your page receives the most clicks by a significant margin. Treat it as prime real estate that should always reflect your current priority. When you publish a new YouTube video, move that link to the top. When you launch a product, pin the product page first. When you are driving newsletter signups, feature that as the number-one option. Creators who update their top link weekly consistently outperform those who set it once and leave it.
Mention Your Bio Link Explicitly in Your Content
Do not assume your audience knows to tap your bio link — tell them directly. End relevant posts with a call to action: "Full guide is linked in my bio." "Grab the free template from the link in my bio." The explicit mention drives significantly more bio link traffic than assuming your audience will explore on their own.
Connect a Custom Domain for Brand Consistency
If you own a personal domain, consider pointing it to your Viopage profile. Instead of viopage.com/yourname, visitors go to links.yourname.com or bio.yourname.com. Custom domain setup is included in the Viopage Pro subscription. This is particularly valuable for creators who are building a long-term brand and want to own their digital presence fully rather than appearing to live on a third-party platform.
Keeping Your Bio Link Page Current
The most common reason bio link pages underperform is neglect. A page that still features a link to a product you launched six months ago, or a YouTube video from a year back, tells every visitor that this creator does not maintain their presence here. That stale quality transfers to your brand perception whether you intend it to or not.
Build a simple maintenance habit: every time you publish something new that you want people to act on, open your Viopage dashboard and update the first link. This takes 60 seconds and keeps your bio link page performing at its best indefinitely. Pair this with a monthly review of your analytics to spot trends and adjust link order accordingly.
- Update your top link every time you publish something worth promoting
- Check analytics weekly — look for links with zero clicks and either improve the title or remove them
- Refresh your profile photo if your visual identity has evolved
- Add new social platforms when you launch a presence there
- Remove links to outdated or inactive content to keep the page focused
Perguntas Frequentes
Posts Relacionados
What Is a Link-in-Bio Tool? The Complete Guide for Creators
Everything creators need to know about link-in-bio tools: what they are, why you need one, and how to choose the right bio link page builder.
STRATEGYHow to Create a Creator Profile Page That Converts
Optimize your creator profile page with proven tips on link order, theme selection, CTA placement, and social proof. Turn bio visitors into clicks and customers.
GUIDEWhy Your Link-in-Bio Needs a Custom Domain (And How to Set It Up)
A custom domain link page builds brand trust, improves SEO, and removes third-party branding. Learn why it matters and how to set one up on Viopage.
Comece a criar seu link na bio hoje
Junte-se a mais de 60.000 criadores que confiam no Viopage. Teste gratis de 7 dias.
Iniciar teste gratis